Signup and registration forms on your website can generate sales, lead generation, and customer growth.
The majority of websites use HTML5. HTML is a language used to communicate on the Internet. You should start at the beginning when learning a programming language.
In this article, I'll show you how to create a simple login form in HTML and CSS, so that you can use it right away.
Demo:
Steps to Follow:
1) Create a Project Folder and open it up in an IDE of your choice and link HTML with CSS with the below code
<head>
  <link rel="stylesheet" href="style.css" />
</head>
2) Next, create a structure for the login page using HTML
<!DOCTYPE html>
<html lang="en">
  <head>
    <meta charset="UTF-8" />
    <meta name="viewport" content="width=device-width, initial-scale=1.0" />
    <meta http-equiv="X-UA-Compatible" content="ie=edge" />
    <link rel="stylesheet" href="style.css" />
    <title>Login Form Demo</title>
  </head>
  <body>
    <div class="login-wrapper">
      <form action="" class="form">
        <h2>Login</h2>
        <div class="input-group">
          <input type="text" name="loginUser" id="loginUser" required />
          <label for="loginUser">User Name</label>
        </div>
        <div class="input-group">
          <input
            type="password"
            name="loginPassword"
            id="loginPassword"
            required
          />
          <label for="loginPassword">Password</label>
        </div>
        <input type="submit" value="Login" class="submit-btn" />
      </form>
    </div>
  </body>
</html>
3) Next, we are adding CSS to style our login page
* {
  margin: 0;
  padding: 0;
  box-sizing: border-box;
}
body {
  background-size: cover;
  font-family: sans-serif;
}
.login-wrapper {
  height: 100vh;
  width: 100vw;
  display: flex;
  justify-content: center;
  align-items: center;
}
.form {
  position: relative;
  width: 100%;
  max-width: 380px;
  padding: 80px 40px 40px;
  background: rgba(0, 0, 0, 0.7);
  border-radius: 10px;
  color: #fff;
  box-shadow: 0 15px 25px rgba(0, 0, 0, 0.5);
}
.form::before {
  content: "";
  position: absolute;
  top: 0;
  left: 0;
  width: 50%;
  height: 100%;
  background: rgba(255, 255, 255, 0.08);
  transform: skewX(-26deg);
  transform-origin: bottom left;
  border-radius: 10px;
  pointer-events: none;
}
.form img {
  position: absolute;
  top: -50px;
  left: calc(50% - 50px);
  width: 100px;
  background: rgba(255, 255, 255, 0.8);
  border-radius: 50%;
}
.form h2 {
  text-align: center;
  letter-spacing: 1px;
  margin-bottom: 2rem;
  color: white;
}
.form .input-group {
  position: relative;
}
.form .input-group input {
  width: 100%;
  padding: 10px 0;
  font-size: 1rem;
  letter-spacing: 1px;
  margin-bottom: 30px;
  border: none;
  border-bottom: 1px solid #fff;
  outline: none;
  background-color: transparent;
  color: inherit;
}
.form .input-group label {
  position: absolute;
  top: 0;
  left: 0;
  padding: 10px 0;
  font-size: 1rem;
  pointer-events: none;
  transition: 0.3s ease-out;
}
.form .input-group input:focus + label,
.form .input-group input:valid + label {
  transform: translateY(-18px);
  color: white;
  font-size: 0.8rem;
}
.submit-btn {
  display: block;
  margin-left: auto;
  border: none;
  outline: none;
  background: #ff652f;
  font-size: 1rem;
  text-transform: uppercase;
  letter-spacing: 1px;
  padding: 10px 20px;
  border-radius: 5px;
  cursor: pointer;
}
.forgot-pw {
  color: inherit;
}

#forgot-pw {
  position: absolute;
  display: flex;
  justify-content: center;
  align-items: center;
  top: 0;
  left: 0;
  right: 0;
  height: 0;
  z-index: 1;
  background: #fff;
  opacity: 0;
  transition: 0.6s;
}
#forgot-pw:target {
  height: 100%;
  opacity: 1;
}
.close {
  position: absolute;
  right: 1.5rem;
  top: 0.5rem;
  font-size: 2rem;
  font-weight: 900;
  text-decoration: none;
  color: inherit;
}
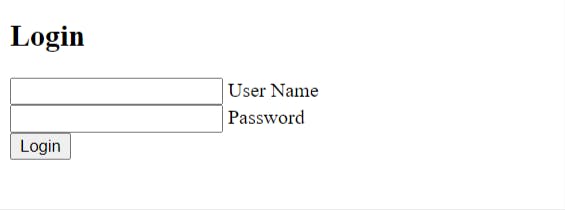
4) Before Applying the CSS the output look like this:

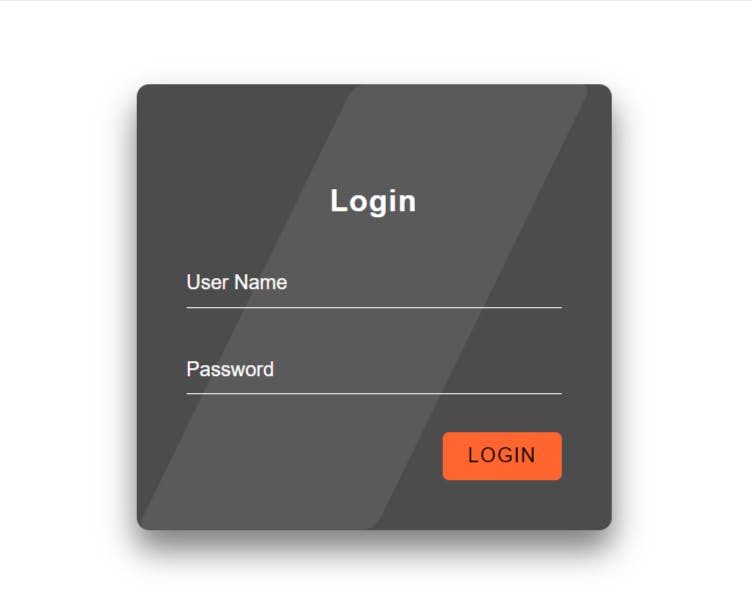
5) After Applying the CSS our final output will look like this:

The Final Output in Video Form:
Have a Look At the deployed site here
A login page has been successfully created. I hope you find this article helpful. Please ask any questions in the comment section if you have any.
You can now extend your support by buying me a Coffee.😊👇
If you want to contact me you can do it here:
Thanks for Reading 😊


